Monday, March 2, 2009

Ceci Soup


I made this soup in homage to the delicious chick peas we ate on the island of Corfu, or Kerkira, Greece. As winter wears out its welcome, I find myself longing for sharp, sunny flavors.

I highly recommend making it the day before you want to serve it, because this hearty bean soup has hidden alchemy: it tastes better the day after you make it, and even better the next day, if there is any left. I have included directions for slow cooker and stove top.


CECI SOUP
serves 8

ingredients
2 cups dried chickpeas, rinsed and sorted
8 cups water
1 can (14 oz) crushed tomatoes
1 package frozen spinach, thawed, or 2 bunches fresh spinach, washed and chopped
1 cup reduced-fat sour cream or plain yogurt (optional)
handful fresh thyme
handful fresh oregano
squeeze of fresh lemon juice
salt and pepper

vegetables, all chopped to roughly the same size as the chick peas:
2 carrots, peeled
1 yellow onion
3 cloves garlic
1 celery root, peeled, about 1 lb.


slow cooker preparation
1. Put the chick peas in the slow cooker and cover with water. Cover and cook on high for 2 1/2 hours, until the peas are tender.

2. Add the tomatoes, chopped vegetables, herbs, and frozen spinach to the slow cooker (if using fresh spinach, wait to add until last hour of cooking). Add more water to almost cover, but make sure not to fill slow cooker more than 3/4 full. Cover and cook on low for 6 - 8 hours.

3. Taste and season with salt and pepper and a squeeze of fresh lemon if you like. Serve with a dollop of sour cream on top.


stove top preparation
1. Place the peas in a stock pot and cover with water; soak overnight. In the morning, drain the peas, then put them back in the stock pot.

2. Add the tomatoes, chopped vegetables, herbs, and frozen spinach to the pot (if using fresh spinach, wait to add until last ten minutes of cooking). Add water to cover. Simmer, covered, until celery root and carrot are quite tender, about 1 hour or so.

3. Taste and season with salt and pepper and a squeeze of fresh lemon if you like. Serve with a dollop of sour cream on top.
Friday, February 20, 2009

Aebleskiver and Poffertjes

Aebleskiver and Poffertjes: Scandinavian culinary cousins with their own Wikipedia entries! These delightful baby pancakes have two noticeable differences that I have observed, which are that aebleskiver are more puffy and less sweet than poffertjes. They both are served under a blizzard of powdered sugar, jam, maple syrup, or a combination of all three. They are not really served for breakfast, like the all-American flapjack; they can be found at fairs and social events.

I was introduced to poffertjes by my Dutch friend Erik, who brought his own special poffertjes pan with him when he moved to New York. That's how good they are!! We quickly incorporated them into our annual New York City Marathon Brunch, taking big plates of them downstairs to eat as we watched the throngs of runners push past our apartment building in Brooklyn. Northern European runners looked on longingly, nearly tripping over their flag-cape wearing competitors.

Earlier this month Nick and I went to Portland for the day; we got there just in time for brunch at Broder, a Swedish-style cafe where everything is wonderful and beautiful. We sat at the counter and watched the cook prepare order after order of aebles on the enormous old stove.


In the video, you can see a brand new batch on the right burner, a half-done batch being turned over on the left burner, and a nearly-done batch in the middle. The cook turns them halfway through with a skewer, although I read on Wikipedia that it is traditional to use a knitting needle. So feel free.

The photo up top is of our order of aebles (with apologies for the poor photo quality). They were well worth the wait. We had a great experience at Broder: the food was delicious and not too fussy, as was the decor. The staff was stylish and nice, a combination that is disarmingly common in Portland and rare everywhere else.

Saturday, February 7, 2009

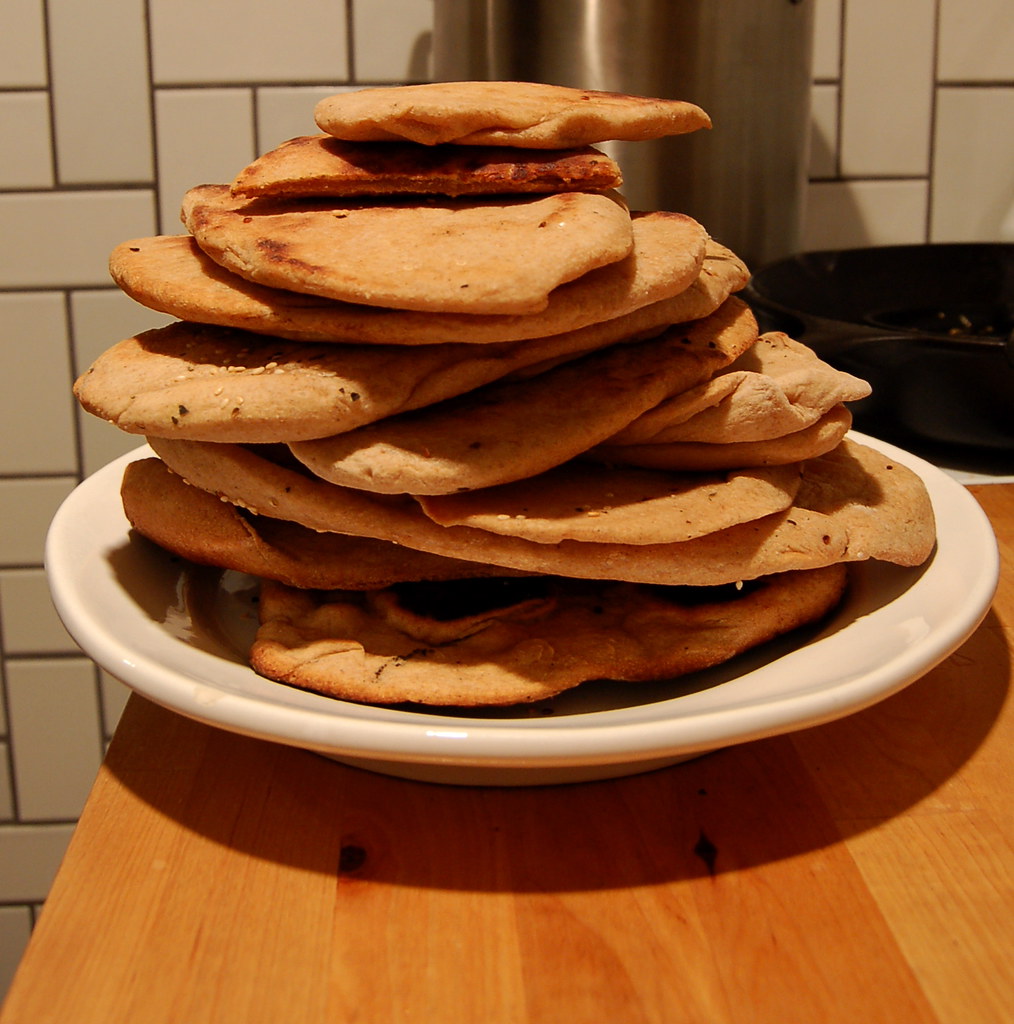
Flatbread with Sea Salt and Sesame Seeds

This recipe is so simple and good; it involves sesame seeds, which are the poster seeds for simplicity and goodness.

We rolled out this recipe with Sarah, Scott, and Brittany the other night, to accompany this deliciously spicy vegan soup and a mint-enhanced salad that I'd made earlier. I started the dough at lunchtime, let it rise for an hour and a half, then formed it into balls and let it rest on the countertop until dinner time.

FLATBREAD WITH SEA SALT & SESAME SEEDS
serves 6 - 8 or more

ingredients
2 cups warm water
2 tsp active dry yeast
3 cups organic all purpose flour
2 cups organic whole wheat flour
3 1/2 tsp sea salt
1/4 cup olive oil

2 tbsp coarsely chopped fresh herbs: thyme, marjoram, oregano
2 tbsp sesame seeds, lightly toasted (don't scorch them!)
sea salt

equipment
cast iron pan or griddle
pizza stone or baking sheet
rolling pin* and nice clean counter top

*Sarah taught me a great tip: if you need a rolling pin, or if several cooks are in the kitchen but there is only one pin, just substitute a tall glass, like a pint glass. Clever girl!

preparation
1. Fill a bowl with 2 c. warm water and sprinkle in yeast. Leave it to dissolve and get bubbly, about 7 - 10 minutes.

2. Meanwhile, whisk together white and whole wheat flour and salt. Now switch to a rubber spatula or wooden spoon and stir in oil, just three tbsps. Add yeast and water; mix until the dough begins to come together. It will be sticky and messy, but some kneading will fix that.

3. Generously flour your counter top and your hands. Turn the dough out onto your work surface and knead for 5 minutes or so. Don't be afraid to strong arm the dough: use your fingers to pull and fold the dough over itself, then use the base of your palm to push the dough into the counter top. After 3 or 4 minutes, the dough will become much smoother. Keep kneading until it is stretchy and elastic, dusting it, the counter, and your hands with more flour if needed.

4. Drizzle some olive oil in a large bowl and rotate it to coat the interior evenly. Roll your dough into a ball and place it in the bowl, rolling it around so that it gets oily all over. Cover loosely with a clean kitchen towel or plastic wrap. Leave the dough in a warm place to rise until it has doubled in size, which takes about 1 1/2 hours.

5. Punch down the dough. Divide it in half, then half again, and again until you have 12 even pieces. Your hands will be pretty oily by now; shape each piece into a ball by lightly rolling it in your palms. Place the balls on a plate and cover until you are ready to bake, or roll them out one by one into ovals or circles.

6. Set oven to warm with the pizza stone or a baking sheet in it. Mix together herbs, sesame seeds, and salt. Set aside.

7. Heat a small amount of olive oil in your cast iron pan. Cook the flatbread for 3 minutes per side, or until cooked through. Lightly brush with oil and dust with salt and sesame seeds. Place in the oven to keep warm while you make the rest.

Friday, January 23, 2009

Another Day, Another Latte VIII

Link
-- from Equal Exchange at the Ballard Market. You can see older posts on the theme of latte by clicking here.

Monday, January 19, 2009

A Lovely Green January Soup: Cream of Broccoli


This simple soup is my way of diving back into this cooking journal. It is quick, light, and restorative, especially on a snowy day. Here's to a new year full of cooking and tasting!


CREAM OF BROCCOLI SOUP
serves 2

ingredients
3 cups broccoli, chopped coarse (about 1 lb)
2 handfuls chopped shallots (about 1 1/2 cups)
1 1/2 tsp mustard seeds
2 tsp unsalted butter
2 c chicken broth (you may prefer veggie broth instead)
1 c water
squeeze of fresh lemon juice
dollop of sour cream OR about 1/4 cup cream (optional, actually)
salt and pepper

equipment
immersion blender -- the blender for people who don't have room for a full-size blender.


preparation
1. Melt the butter in your soup pot; add the shallots, salt and pepper, and mustard seeds.
2. When the shallots become soft and translucent, add the broccoli, broth, and water. Let the soup simmer, covered, approximately 20 - 30 minutes, until the broccoli is nice and tender.
3. Remove soup pot from the burner. Blend to your preferred consistency using your preferred blending tool.
4. Return the pot to the burner, on very low heat. Stir in the cream or sour cream, and a generous squeeze of lemon juice. Season to taste.

Monday, May 26, 2008

strawberry tart with basil-infused whipped cream


strawberry tart, originally uploaded by isabelle gr.

Let the strawberry season begin! This picture shows the second strawberry tart of the year, made with the extra ingredients from the first. The first was for Mother's Day brunch, and it was much neater and prettier, with concentric circles of heart-shaped berries. It did not survive long enough to be photographed any closer than this:


For the second one I just heaped the berries into the tart pan, and I think they tasted better for the lack of organization. Especially since we ate both batches of berries with the most incredible confection in the universe: basil-infused whipped cream. Yes! It's real! A thousand thank yous to the cooks at Martha Stewart, who published this minor miracle in the May issue of Living alongside their strawberry galette. Here is my adaptation:


BASIL-INFUSED WHIPPED CREAM
Serves 6 as an accompaniment to a pie or tart.


ingredients

1 c. heavy cream
1/3 - 1/2 c. fresh basil leaves
2 tbsp sugar
1/2 c. mascarpone


equipment

hand or stand mixer or whisk
sieve or fine-hole colander


preparation

1. In a small Pyrex or stainless steel bowl, combine first three ingredients over a saucepan of simmering water. Stir gently until the sugar has dissolved, which will only take a minute or two. Remove bowl from heat and allow it to cool slightly. Cover the bowl and refrigerate it for 2 to 3 hours. The basil flavor with strenghten over time. Yum! While the cream chills, find your mixer whisk attachment and stick it in the freezer along with a stainless steel bowl. My grandma always told me that this was the crucial step to perfecting whipped cream, and I believe her.

2. When the cream is ready (you'll probably need to taste test this once or twice), remove the larger leaves, then pour the cream through a sieve into the frozen mixing bowl. Add the mascarpone before whipping the whole thing until peaks form. The mascarpone will keep the cream from becoming too stiff.

At this point you can either serve it immediately or refrigerate it until dessert time, up to 2 hours or so. After that, someone is going to eat it right out of the fridge. If you can save some till morning, I've heard it tastes great on an omelette full of fresh herbs. If!

nick's springtime risotto


nick's spring risotto, originally uploaded by isabelle gr.

Risotto is for all seasons. Nick demonstrated this recently with a tasty dinner of lemon zest risotto featuring his patented peppery spice mix. Tender asparagus, oyster mushrooms, and bacon were the stars that night, but we make this dish often with whatever looks best.

NICK'S RISOTTO

Serves 4.

ingredients

1 1/2 c. arborio rice
5 c. chicken or vegetable broth
1 medium onion or 3 shallots, finely chopped
1 egg yolk
2 tbsp. olive oil
1 lemon, juice and zest
chunk of parmigiano
handful of fresh rosemary and sage leaves

1 bunch of young asparagus, trimmed and chopped into 2-3 inch bites
oyster mushrooms, as many as you like, wiped clean and separated
4 strips of all-natural bacon

1/2 tsp black peppercorns, or to taste
1/2 tsp coarse sea salt, or to taste
dash of red pepper flakes


preparation

1. Heat 2 tbsp. oil in a heavy, deep-sided pan, then add the chopped onion and cook until translucent, about 5 minutes. Meanwhile, warm the stock in a covered saucepan. When the onions are translucent, add the rice and stir continuously for another minute until the rice is glossy.

2. Stir approximately 1 cup of the stock into the rice and onion mixture and continue stirring -- stir your heart out! When the rice has absorbed most of the stock, add another 1/2 cup or so. Repeat this step until the rice is tender, usually about 30 minutes. As the risotto cooks, chop the herbs and zest the lemon. Add the zest and half of the herbs to the risotto about 15 minutes into the process.

3. Heat a second pan and cook the bacon until crisp. Drain bacon on a paper towel and wipe most of the fat out of the pan. For a vegetarian alternative, we sometimes omit the bacon and simply heat another tbsp of olive oil in the pan. Turn up the heat to medium high and sautee the asparagus and mushrooms. Break the bacon into pieces and stir these and the vegetables into the risotto about 25 minutes into cooking.

4. Quickly whisk together the egg yolk and lemon juice in a small bowl. Grate as much cheese into it as you like, but remember that parmigiano is salty, so you won't need to add a lot of extra salt at the table. As soon as the risotto is done, move the pan to a cool burner and stir in the egg and lemon mixture. With a mortar and pestle, grind together the salt, pepper, and remaining herbs. Add to the risotto just before serving.